
Røgeffekt med gimp - hvordan det fungerer
I Gimp kan du skabe imponerende røgeffekter og lade det dampe og ryge på dine fotos. Instruktioner og et billedgalleri kan findes her.
Gimp: Opret røgeffekter med IWarp-filteret
- Åbn Gimp og brug "File" til at oprette et nyt dokument, der er omtrent på størrelse med en røgsøjle - lidt mere end det dobbelte af bredden. Fyld derefter baggrunden med hvid maling. På denne måde kan du bedre genkende røg senere, mens du arbejder på den.
- Tilføj nu et nyt lag i lagmenuen med "Nyt lag ...", vælg "Gennemsigtighed" som lagpåfyldningstype i dialogboksen og klik på "OK".
- Indstil en mørkegrå som forgrundsfarve, og tegn en tyk, lodret linje med børsteværktøjet. Brug derefter en lysere grå nuance og en mindre børsteradius til at tegne et andet slag (ca. midt i det første). Det er ikke vigtigt, at du arbejder meget præcist, slagene kan let blive skævt og skævt.
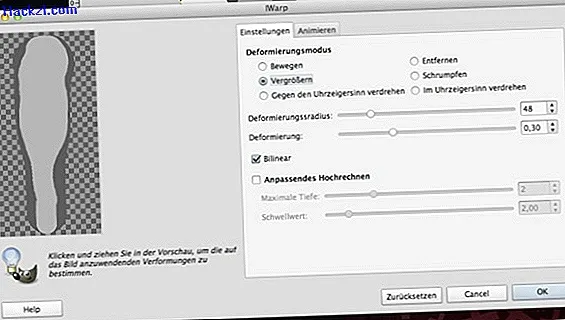
- Åbn nu filteret "IWarp", som du finder i menuen "Filtre" under "Distortion Filters". Vælg deformationsmodus "Forstør" og en deformationsradius på ca. 30 til 60.
- Gå nu i preview-vinduet med museknappen trykket fra midten af dit slagtil dets øvre kant. Gentag processen om nødvendigt en eller to gange, indtil din linje er meget tykkere i den øverste halvdel end i den nedre halvdel.
- Skift nu deformationsfunktionen til "Krymp" og flyt i preview-vinduet med museknappen trykket ned fra midten af dit slag. Når du er tilfreds med resultatet, skal du klikke på "OK".
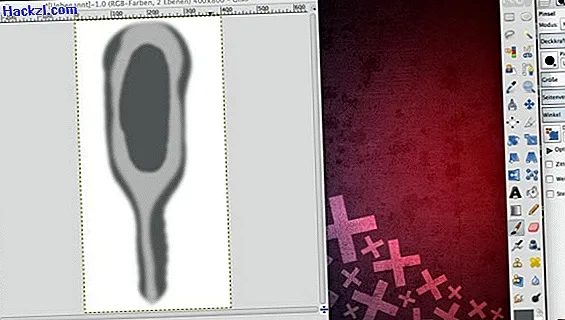
- Brug den gaussiske sløring til at sløre dit billede med en radius på ca. 10 til 20 pixels. Du finder "Gaussian sløring" i menuen "Filter" under "Sløring".
- Brug derefter pipetten til at vælge den mørkere grå nuance fra dit billede som forgrundsfarve og tegne en oval i det øverste område af dit slag med børsten. Igen er det ikke vigtigt, at du arbejder særlig præcist.
- I menuen "Filter" skal du klikke på "Gentag Gaussian sløring" for at blødgøre dit billede igen med de tidligere angivne værdier.
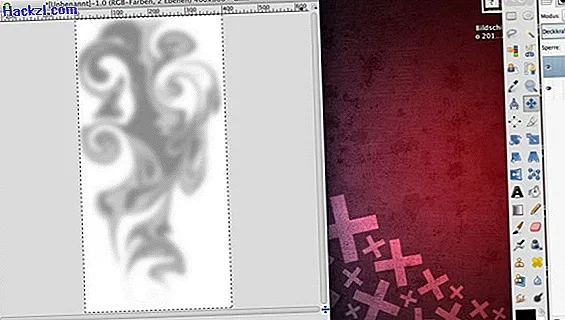
- Åbn filteret "IWarp" igen, men vælg "Vend mod uret" som deformationsmodus denne gang. I forhåndsvisningsvinduet skal du holde museknappen nede og bevæge dit slag op og ned et par gange, indtil hvirvlerne ligner en sky af røg. Klik derefter på "OK".
- Påfør nu Gaussian sløring igen, indstil en radius på 20 til 30 pixels.
- Nu kan du kopiere det lag, som din røg er placeret på, og indsætte den i et andet billede. Det hele ser endnu mere realistisk ud, hvis du reducerer lagets opacitet lidt med røg lidt i det nye dokument. Du kan læse de enkelte trin igen i vores billedgalleri.

Lær hvordan du opretter en glødende stjernehimmel med Gimp i dette praktiske tip.
Seneste videoer
Opret et gennemsigtigt lag på en hvid baggrund.

Tegn to lodrette linjer med forskellig tykkelse ved hjælp af forskellige gråtoner.

Brug IWarp-filteret i deformationsfunktionen "forstør" og "reducer" til at definere den ru kontur af din røgsky.
Rediger mellemresultatet med den Gaussiske slør.

Tegn en mørkegrå oval øverst på dine streger, og anvend den Gaussiske slør igen.
Brug IWarp-filteret til at indsætte virvlere i deformationsmodus "mod uret".

Til sidst blødgør du din røg igen.
Hvis du vil indsætte røgskyen i et andet billede, skal du mindske let opaciteten af det lag, der indeholder røg.
