
App Inventor: Opret Android-app - en tutorial
I dette praktiske tip forklarer vi, hvordan man opretter Android-apps med App Inventor. Følg denne tutorial for at oprette apps på relativt kort tid.
Log ind på MIT App Inventor
Gå til App Inventor-webstedet, og klik på knappen "Opret" i øverste højre hjørne.
- App Inventor kræver tilladelse til at få adgang til din Google-konto. Bekræft ved at klikke på "Tillad".
- Efter den første login kan du deltage i en undersøgelse. Hvis du ikke ønsker dette, skal du klikke på "Tag aldrig undersøgelse".
- Klik derefter på "Fortsæt" til arbejdsområdet App Inventor.

Opret den første app i App Inventor - layoutet
- Klik på knappen "Nyt projekt" i øverste venstre hjørne. Indtast projektnavnet, og vælg "Ok".
- Træk nu en "Label" fra "Brugergrænsefladen" til venstre ind på skærmen vist i midten. Under "Egenskaber" kan du ændre "Tekst" for den markerede nyligt tilføjede etiket.
- Gem dit projekt via "Projekt" og vælg "Gem projekt".
- Du kan nu glide alle andre UI-elementer ud på skærmen. Andet medieindhold kan også tilføjes via "Tegning og animation".
- Brug "Layout" til at ændre arrangementet af dine elementer.
Logik over blokke - et eksempel
Hvis du vil oprette yderligere skærme til din app, skal du klikke på "Tilføj skærm". Derefter kan du f.eks. Gå til det andet skærmbillede i dit layout ved hjælp af "Button" UI-elementet. For at gøre dette har du dog brug for logik, der kører i baggrunden. I app-opfinderen bygger du dem ved hjælp af "blokke".
- For at gøre dette skal du klikke på "Blocks" ved siden af "Designer" i øverste højre hjørne. Derefter går du til den tilsvarende skærm og klikker på knappen i venstre "Blocks" -visning.
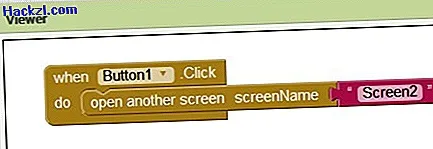
- Vælg funktionaliteten "når Button1.Click do".
- Indsæt nu et "Kontrol" -element i dette "Puslespil" -element, nemlig "åbn et andet skærmskærmnavn".
- Nu mangler kun skærmnavnet. For at gøre dette skal du klikke på "Tekst" i Blocks-displayet og vælge det øverste element, der kun består af to anførselstegn.
- Indtast navnet på skærmen i dette tekstelement, i dette eksempel "Skærm2".
Test appen på din smartphone
Hvis du vil teste dine apps oprettet i App Inventor direkte på din Android-smartphone, skal du følge nedenstående trin.
- Installer MIT App Inventor Companion-app på din Android-smartphone.
- Kontroller, at din computer og Android-smartphone er på det samme WiFi-netværk.
- Åbn appen på din smartphone, og klik på "Opret forbindelse" i den øverste menulinje på din pc og vælg "AI Companion".
- Tryk på "scan QR-kode" i appen på din smartphone, og skan QR-koden, der vises på din pc. Indtast alternativt den 6-cifrede kode, der vises i appens tekstfelt, og tryk på knappen "Opret forbindelse med kode".
- Appen kan nu afprøves på din Smarpthone.
Test appen med emulatoren
Hvis du ikke har en smartphone tilgængelig, så test din app på emulatoren, der er integreret i App Inventor.
- Download og installer App Inventor-softwaren.
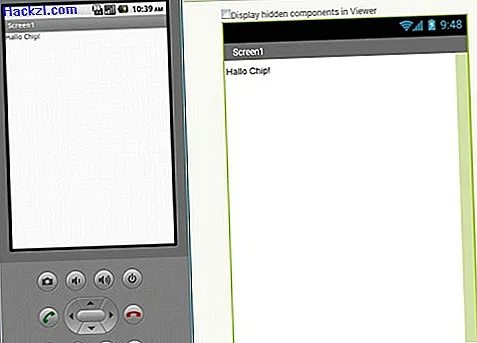
- Åbn nu det installerede program. En mobiltelefonskærm åbnes på din pc.
- Klik nu på "Opret forbindelse" i menulinjen i App-Inventor under dit åbne projekt og vælg "Emulator" der. Du skal muligvis trykke på "Nulstil forbindelse", hvis du tidligere var tilsluttet en smartphone.
- Programmet vises nu i emulatoren.
- I nogle tilfælde vil du se en fejlmeddelelse. Companion-appen er derfor ikke længere opdateret. Klik derefter på "OK" i det vindue, der vises.
- Bekræft opdateringen i emulatoren med "OK" og "Installer". Klik til sidst på "Udført" på emulatorskærmen.
- Forbind igen via "Connect" -> "Reset Connection" og derefter "Connect" -> "Emulator".
Når du har oprettet din app, kan du gemme en .apk-fil af din app på din computer i menulinjen via "Byg". Når du har offentliggjort appen på Google Play, skal du også overveje at markedsføre din app.