
Opret 3D-font med Gimp - hvordan det fungerer
Med Gimp kan du give dine skrifttyper en smart 3D-effekt. Vi viser dig, hvordan du gør dette med billedredigeringsværktøjet.
Gimp: Opret 3D-font i 10 trin
Uanset om det drejer sig om invitationer, håndsæt eller dit eget websted - 3D-tekst er et stort blikfang næsten overalt. Du kan forstå de komplicerede trin i instruktionerne med Gimp igen i vores billedgalleri.
- Åbn et nyt tegneområde i Gimp, og indtast det ønskede bogstav ved hjælp af tekstværktøjet. Det er bedst at bruge en lys skrifttype på en mørk baggrund.
- Vælg derefter perspektivværktøjet, og vip teksten lidt tilbage. Så snart du kan lide resultatet, skal du klikke på "Transform".
- Højreklik på tekstlaget og kig efter posten "Dupliceret lag". Klik på øjeikonet på det nye lag for at skjule det.
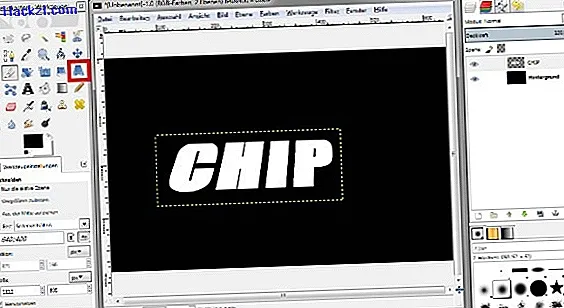
- Nu er det tilbage til det originale tekstniveau: Højreklik på posten og vælg indstillingen "Valg fra alfakanal".
- Giv nu teksten en lidt mørkere farve. Du kan gøre dette enten med fyldeværktøjet eller med "Farver"> "Farvelæg".
- Annullér derefter markeringen igen via "Valg"> "Intet".
- Højreklik på tekstlaget igen og vælg indstillingen "Lag til billedstørrelse".
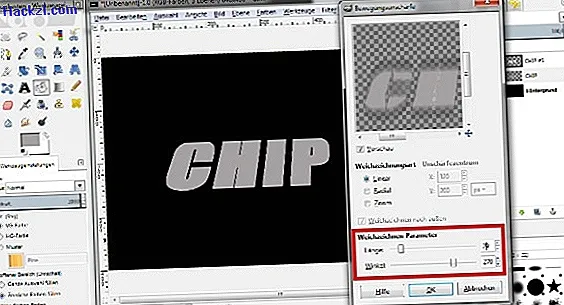
- Under "Filtre"> "Sløring" vælger du posten "Bevægelsessløring". Sæt skyderen på "Længde" til "27" og "Vinkel" til "270". Klik derefter på "Ok".
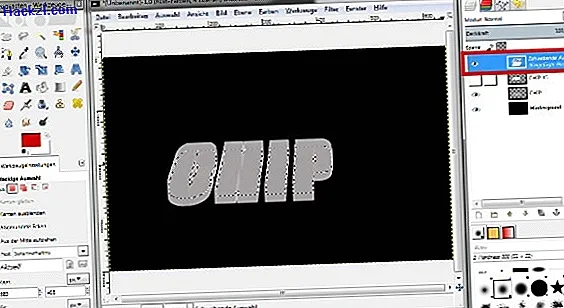
- Kopier nu tekstlaget til dit udklipsholder ved hjælp af tastkombinationen [Ctrl] + [C]. Tryk derefter på tastekombinationen [Ctrl] + [V] 30 til 40 gange for at indsætte laget igen. Skrifttypen skal langsomt få en 3D-effekt.
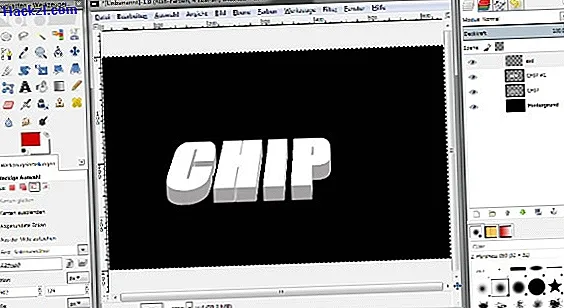
- Endelig skal du aktivere øjesymbolet på det tidligere skjulte lag. 3D-effekten er nu færdig.
Vi viser klart alle trinene i vores billedgalleri.
Seneste videoer
Du kan vippe din tekst bagud ved hjælp af perspektivværktøjet. Leg rundt med indstillingerne her, indtil du er tilfreds med perspektivet.
Når du har duplikeret og farvet tekstlaget, skal du anvende filteret "Motion sløring". De korrekte værdier for længde og vinkel er vigtige her.
Herefter duplikeres laget op til 40 gange. Den hurtigste måde at gøre dette på er at bruge tastekombinationen [Ctrl] + [C] og derefter [Ctrl] + [V]. Jo mere du indsætter laget, jo bedre skal 3D-effekten se ud.
Endelig skal du vise det første lagskopi igen. Din 3D-tekst er nu klar, og du kan gemme den eller kopiere den til et andet billede.
